| Home | About | Membership | Contact | Despatches | Supplies | Forum | Gallery | News |
|
|
|||||||||
|
|
Mulberries
and Gooseberries by Chris Bridges Background Following
the evacuation of the British Expeditionary Force (BEF) from Dunkirk in
1940, the British began planning their return to continental Europe, seeing
it as the only way to conclude the war with Germany. The
disastrous raid on Dieppe in 1942, proved to the Allies that a frontal
assault on a heavily defended port/harbour was out of the question. The
invasion, therefore, would have to come on the beaches. As we know, the
invasion planners chose the Normandy coastline on which to make the
landings. For
any invasion of Europe, however, a great deal of supplies would be required
by the fighting divisions. The nearest port was Cherbourg which, if
captured, was not expected to discharge more than 1300 tons per day, as it
was predominantly a passenger port and not suitable for cargo. Even for the
initial plan of a three-divisional assault a supply rate of 10,000 tons per
day was required by D-Day plus 5. When the number of assault divisions were
later increased to five, this supply problem was heightened. The
only way to supply the Allied armies until enough ports had been captured
was, therefore, from the beach. This was risky, however, due to the
unpredictable nature of the English Channel. Some form of protection was
required, therefore, to save the smaller craft from sinking in rough
weather, and to allow larger ships to carry on discharging. Thus,
the Mulberry Harbour was born. The actual proposer of the idea is disputed,
but it is believed to be Commodore John Hughes-Hallett, naval commander of
the Dieppe raid and Naval Chief of Staff to the Overlord planners. At a
meeting following the Dieppe raid he declared that if a port could not be
captured, then one should be taken across the Channel. Although this was met
with derision at the time, the concept of the Mulberry Harbours began to
take shape when Huges-Hallett moved on to the Overlord planning team.
The
Development of the Harbour Components The
Piers Due
to nature of the shallow beaches within the invasion area, at low tide large
stores ships could not get within a mile of the beach. To unload these
ships, therefore, a pier was required. But unlike traditional piers it would
have to float up and down with the tide as this could rise and fall up to 20
feet during spring tides (see Figure 1).
The
specification for the pierheads were that they had to be capable of berthing
three 2,000-ton coasters, whilst the piers themselves had to allow a
continuos flow of traffic and would not be less than a mile long. Whales:
The piers (or whales) were actually bridge sections designed for trains (see
Figure 2). These were 80 feet long and incredibly flexible allowing
torsional displacement of 40°
along the span and an angular movement between spans of 24°.
Some spans were even telescopic to take into account of the: variation in
the height of the tides; variation in the angle of the roadway at high and
low tides (the bridge would be slightly longer at low-tide); movement of the
bridge sections during heavy storms; and the variable distance between
pierheads which were to be linked together.
Beetles:
The floats, or pier pontoons, supporting the piers were called Beetles (see
Figure 3). They were required to support 56 tons, which included a 25-ton
tank. Due to a war time shortage of steel
(for the 460 floats needed some 5,000 tons of steel was required) reinforced
concrete was used instead. Wooden fenders were added to the sides and bottom
to protect the floats from damage.
Spud
Pontoons: The pierheads were pontoons designed with legs that would fix to the
seabed and allow the pontoon to move up and down (see Figure 4). The
pierhead could, therefore, be used at low and high tides with no problems.
The legs were called spuds, hence the name spud pontoon. The pontoon itself
was 200 feet long, 60 feet wide and 10 feet deep, and weighed over 1,100
tons. It could accommodate 21 men and had a kitchen, sanitation facilities
and heating appliances. Types of pierheads can be seen on Figure 5.
The
Breakwaters To
protect the ships unloading at the piers from the changeable channel weather
a system of breakwaters were developed. Bombardons:
A number of ideas were considered for breakwaters. The first of these
involved the use of compressed air. Perforated pipes were to be laid on the
sea bottom around the area to be protected and compressed pumped through it.
The result was a calm area within which ships were able to discharge at the
piers. Although the principle was quite sound, the trials proved that the
pipes would be moved in any heavy swell and that an enormous amount of power
was required (at least 1.5 million horse-power for an area half that
required). Robert
Lochner, who was in charge of this project, thought about what the were
trying to achieve and realised that waves were in fact only surface deep
and, therefore, only a shallow barrier was required. From experiments in his
garden pond with a lilo, Lochner and his team went on to produce a floating,
steel hollow cruciform “tube” which would form a suitable breakwater
(code name Bombardon - to suggest a link with anti-aircraft defences) (see
Figure 6).
Pheonix:
The primary breakwater was to be provided by concrete caissons. These were
to be from 25 to 60 feet high and 174 to 204 feet long. The displacement was
up to 6,000 tons. Due
to lack of space for mooring, the caissons had to be sunk until required.
This was not taken into account during the design stage and a hurried
conversion programme was implemented. Unfortunately, after sinking a number
of caissons it was realised that the onboard pumps provided by the Royal
Engineers and required to raise the Phoenixes were inadequate. The Royal
Navy was, therefore, appointed to raise the Phoenixes as they had the right
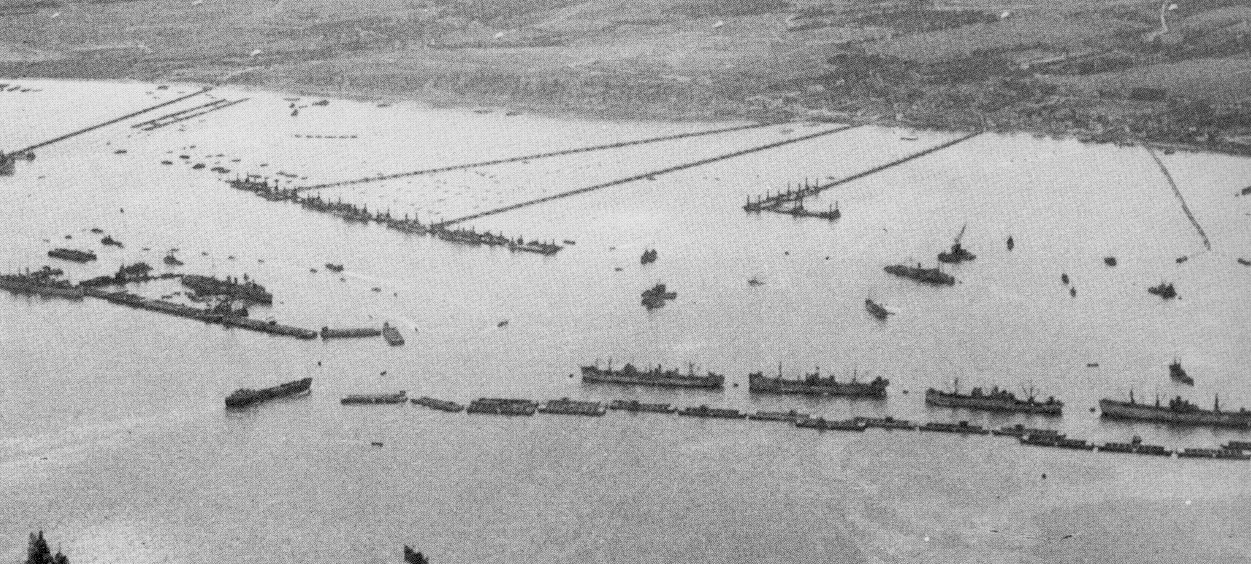
equipment and the salvage knowledge. Gooseberries:
With
the increase in the number of assault divisions and beaches following the
appointment of Eisenhower and Montgomery, the use of three beaches, as well
as the Mulberries, were required to discharge supplies for the Allied
armies. As
the Mulberries were located in the centre of the invasion area, small boats
unloading at the beaches at the flanks would be unable to get to the
Mulberries in the event of bad weather. Also, as over 4,000 small ships were
expected to be used in this operation, the Mulberries just did not have the
space to protect them all. The
solution was to provide five shelters (Gooseberries), one at each beach,
formed by blockships (see Figure 7). These were later developed to provide a
sort of landing ship service station, with facilities for repairs,
refuelling, and first aid as well as accommodation.
The
Construction of the Harbours On
the afternoon of 6 June the Mulberry forces were given the order to sail
(see Figure 8). Arromanches,
which was the location of Mulberry B, was not one of the assault beaches.
The engineer vanguard was, therefore, landed to the east and had to make
their way there by foot. Luckily no opposition was encountered. Their
US counterparts had a much harder time as the location of Mulberry A was
Omaha beach where, apart from the fighting, there were a number of beach
obstacles to clear. The
first task was to carry out a hydrographic survey of the beaches and mark
the locations of the various elements. Next, on 7 June, the blockships for
the Gooseberries were despatched. Apart from the problem of skippers of tugs
releasing their tows too early, at Utah three blockships were sunk
prematurely by the fire from ‘88s’. Two were luckily sunk in the right
position. At
Omaha, the Americans decided to leave two gaps in the line of blockships
attached to Mulberry A, to allow easier access to the beach. This was
against the advice of the Royal Navy who warned that the sea would pour
through in the event of a storm - as it did on 18 June. All
the Bombardons were in place by 17 June, but they did not start placing the
Phoenixes until 10 June. The piers began being placed on 9 June. It
should be emphasised that all the components for the harbours were towed
across the English Channel. This was not easy as one can imagine with around
40% of all the tows lost. The sea and weather being the main problem, but
there was always the possibility of E-boat attack. By
16 June the Germans had discovered the purpose of the Mulberries and began
to launch air attacks. The biggest threat was, however, mines. These were
laid by ship and often aircraft in such numbers that, due to the intensity
of traffic, were bound to be set off sooner or later. Mine-spotting parties
were, therefore, established. The
Storm A
storm of Force 6-7 raged through the English Channel on 19-22 June. On
receiving the weather forecast the British took extreme precautions, even
threatening to sink ships that were not unloading if they refused to leave
the harbour. Ships or Bombardons that broke loose were to be sunk with PIATs
if they were to threaten the integrity of the harbour. The effect on the
British was five destroyed Phoenixes, damaged piers, the disintegration of
the Bombardons, and about 250 small craft sunk or battered onto the shore. The
effect on the Americans was much worse due to: (i) the more exposed position
of Mulberry A; (ii) their failure to construct their Gooseberries to design;
(iii) their failure to construct the Mulberry to specification; and (iv)
their failure to take adequate precautions on hearing the forecast of the
storm. They lost their piers as well as twenty Phoenixes, seven blockships
and over 100 small craft. Eisenhower ordered that Mulberry A should be
abandoned and what was salvageable was used to reinforce Mulberry B. The
Gooseberries stood up rather better and survived the storm.
Success
or Failure? There
have been many arguments as to whether the Mulberry Harbours were worth the
effort. Hastings(1984) is one of the more recent historians who criticise
the decision to build the Mulberries, and their failure to provide the
goods. Apart
from the fact that the harbours took up a considerable amount of the nations
resources for their construction, there are considerable questions over its
effectiveness, especially when compared to the rate of unloading on the
beaches. The following figures are usually quoted to show that the
Mulberries were not, in fact necessary:
The
Discharge of Supplies, Vehicles and Troops, 6-19 June 1944 (Hartcup,
1977) During
this period, however, the Mulberries were still under construction with
Mulberry B unable to take vehicles due to the LST pier being incomplete.
During the first two days of the storm over 2,000 tons of ammunition was
unloaded at Mulberry B whereas nothing could be unloaded on the beaches
(Walter, 1986). This was at a crucial time in the battle for the Allies. Over
the long term Mulberry showed its true value. Up to the end of August,
Mulberry B unloaded 40% of British stores. By the end of October, 25% of all
the Allies supplies, 20% of personnel, and 15% of vehicles had past through
the Mulberry B. The remainder of supplies etc. came through Port en Bessin,
Ouistreham, later through the ports of the Pas de Calais, and of course,
across the beaches. Mulberry
A and B were designed to facilitate the unloading of 12,000 tons of stores
per day (Mulberry B to take 7,000 tons) (Mitchell, 1994). In the event,
Mulberry B averaged 6,000 tons per day occasionally reaching 10,000 tons
with 12,000 tons in reach if bottlenecks hadn’t occurred ashore (Harris,
1994). With
the Allies failure to capture intact ports within the first few months of
the fighting, the Mulberry harbour must be regarded as a necessity. It
undoubtedly helped the Allies survive over this period and must be regarded
as an unqualified success.
Bibliography Below
is a list of various references that I have consulted. A great deal of
detail was obtained from Hartcup, but for a general overview of the Mulberry
Harbours I recommend White, Mitchell or Harris. Harris,
A. The Mulberry Harbours. Royal
Engineers Journal, Vol. 108, April 1994. Hartcup,
G. Code Name Mulberry: The Planning,
Building and Operation of the Normandy Harbours. (David & Charles,
Newton Abbot, 1977). Hastings,
M. Overlord: D-Day & the Battle
for Normandy. (Simon & Schuster, New York, 1984). Mitchell,
H. The Mulberry Harbours - civil engineering’s greatest project. Civil
Engineering Surveyor, June 1994. Walter,
A.E.W. A Harbour goes to France. Royal
Engineers Journal, Vol. 100, March 1986. White,
B. The artificial invasion harbours
called Mulberry. (Viking Group, England, 1980). Winney,
M. (Ed.) New Civil Engineer: The
Mulberry Harbour 1944-1994. (Thomas Telford Ltd., London, 1994).
|